
Ofttimes when building for WordPress I find myself in a situation which requires me to move a ton of content from a clients old site to a new one. If I’m lucky (relatively speaking) it’s built on another CMS such as Drupal or Joomla which I can export content from pretty easily, but most times it’s a crappy site built using plain HTML and Microsoft Frontpage *shudder*, and it only has 4-5 pages of simple content. If I’m super lucky it has hundreds of pages rather than a few, that’s when things get fun. If you’ve ever been the victim of the busy work known as “content-moving” fear no more, Python is here to save the day!
Warning: I am nowhere close to a good Python developer, I use it mostly on the off chance I need scraping done or other small tasks. The code displayed here will probably make a good Python developer scream in agony, so be aware this is not meant to be good code, just code that gets the job done. Ye have been warned.
1. Analyzing The Site
Finding Patterns
The first and most important thing you need to do is understand the site you need content from. More specifically we need to know in what way the pages are linked together and the relationship those links have. For example if I have an e-commerce website and I know how many products it has and every product is listed by its ID like so:
http://site.com/product/1
http://site.com/product/2
etc..
Then all we have to do is tell Python to loop up the ID’s and grab content until we have the correct number of products.
Most sites aren’t this easy but you never know, and it’s important to analyze these things first since we’re trying to be lazy and the least amount of time doing busy work is great.
More likely you’ll have a main webpage then a lot of links to other pages in <a> tags. The main idea is that you need to know how the pages interact with each other. For instance if it’s a store, are there subcategories? Are there sub-sub categories? How are these pages linked together? Things like this. Figure out how you can tell Python to programmatically link these pages together.
Selecting our Content
This wouldn’t be a programming blog if I didn’t do at least one article about gathering and manipulating data from Hacker News, so for this post I’ll be gathering the front page stories from Hacker News and turning them into regular posts in my WordPress site.
What we want is the value of the list of links on the home page (and maybe expand to page 2).
To tell Python how to find this we need a unique selector or a way to be able to tell the links apart from the rest of the site. It’s easy for us since we have brains and logic n stuff, however it’s a very different world for Python.
Luckily Python has a package to do just about anything and everything, and it just so happens that there’s one called BeautifulSoup which makes sifting through HTML much, much easier.
If we look through the documentation for BeautifulSoup we can see that we can use a function called select that makes selecting our content as simple using CSS-like selectors.
Our goal therefore should be to be able to select our content like we would if we were trying to style it using CSS.
To start off let’s take a look at the Hacker News home page:
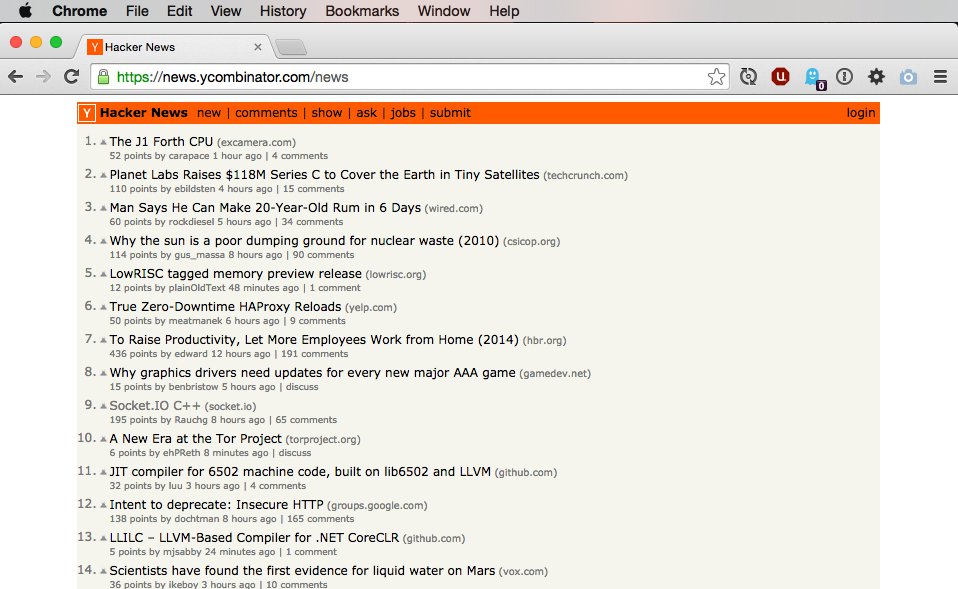
Just from looking at the site we can see that there is a header, content area, and footer (offscreen). These are simple things but it’s important to notice what common page elements exist throughout the site. From experience I can tell you that, so long as you stay in the news area, the elements remain in the same place.
Let’s open Chrome Inspector tools and see how page is laid out:
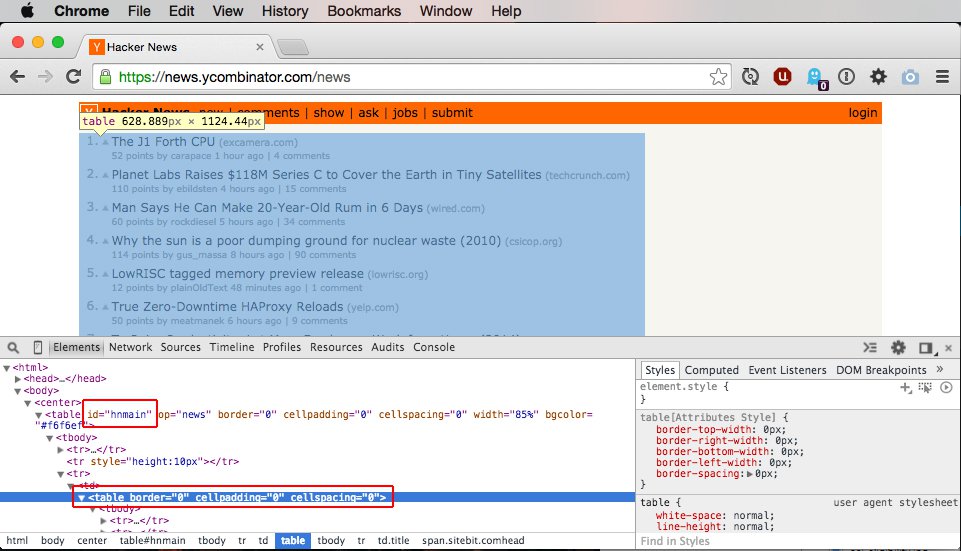
If we go directly to the table element containing the content area and our links we see that there is nothing distinguishing about this table element that we could use to tell Python where it’s located. Captain Hindsight says that it would have been a good idea to add a class or id distinguishing the content area from the rest of the site, but we work with what we have.
Since we can’t go directly to our links we have to start higher in the DOM tree. To start from the body tag we can see that directly inside the body there is a center tag and directly inside that there is a table with the ID of hnmain. ID’s are very important since it’s a unique selector for an specific element (in theory), so be sure to keep an eye out for good ID selectors.
Since the hnmain table element contains our links and is common throughout the site (or at least the part of the site we’ll be needing) we’ll start there. The first TR inside hnmain is the header of the site. Since we do not need information from this we can ignore it. The next TR is simply for spacing between the content and the header so we can ignore it too. The third TR hold the content area, so it’s exactly what we’re looking for. Inside this TR there’s a TD then another table element, this is the table element we’ve been trying to get to.
So far we’ve expanded our selector to the following (not syntactically correct):
table#hnmain > tr:third-child > td > table
Now we have our content area let’s look at how the links are structured inside the table element:
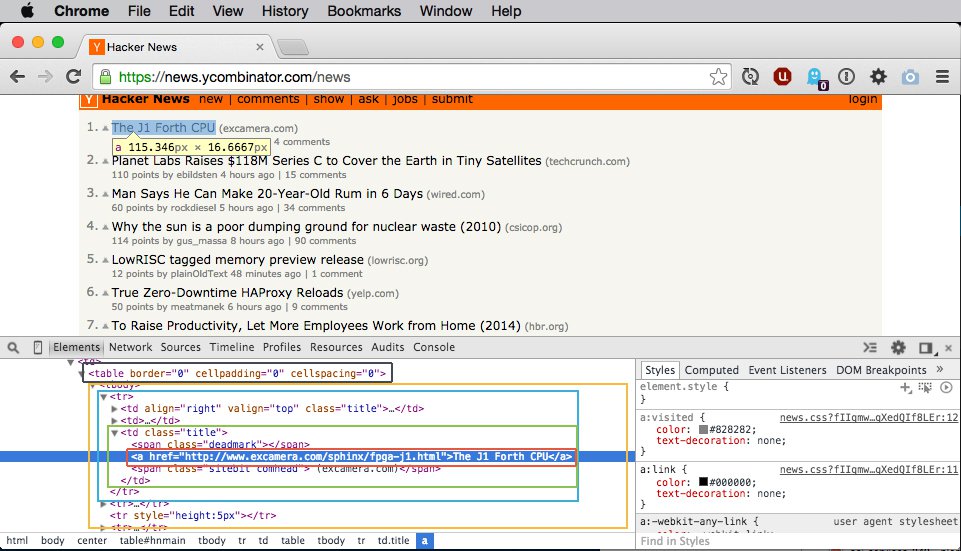
We can see that inside the table element we have a TBODY (we can ignore this since it’s created by Chrome and won’t be included in the HTML sent to us by Python) and inside of that we have many TR elements.
Each group of 3 TR elements (yellow box) represents one “link”, the first showing the rank, upvote, title, and site and the second showing the points, poster, timestamp, and comments. The third is simply there for spacing.
Since we only want the link and the link’s value we only want the first TR (blue box) in each group of 3. Inside this TR we have a TD with the class of “title”, which confusingly contains only the rank. The second TD contains the upvote symbol. The third TD is the second TD element with the class “title” (green box) and this actually contains the link element we need (red box).
To make this simple here’s our link structure in bold (once inside the content table element):
- table
- tr (rank, title, site, etc.)
- td.title (rank)
- td
- td.title
- span
- a
- Link Text
- span
- tr (points, comments, etc.)
- tr (space)
- tr (rank, title, site, etc.)
- tr (points, comments, etc.)
- tr (space)
- etc.
- tr (rank, title, site, etc.)
Using this knowledge we can form the pseudocode to tell Python how to get our content:
rows = beautifulsoup.select('table#hnmain > tr:third-child > td > table > tr')

foreach row in rows
    if row has title element
        linkelement = link.select('td:third-child a')
That’s pretty neat. Let’s build it!
2. Scraping the Site
Getting our Script ready
We’re going to need to install a few helpful Python packages before we begin:
Also make sure you have a folder called pages in the same directory as your script. The script will download HTML files here for faster checking (you can change this later on).
Getting WordPress ready
You’re going to want to setup a user on your WordPress site who can use XML-RPC (also disable any plugins blocking XML-RPC from operating). If you have any structure that you need to build before adding content now’s the time to do it (Custom Fields, Custom Post Types, etc.).
Starting our Script
At the top of our script we have our import statements:
from wordpress_xmlrpc import Client, WordPressPost
from wordpress_xmlrpc.methods import posts
from slugify import slugify
import requests
import os.path
from bs4 import BeautifulSoup
Note that depending on the type of data you’re getting the Python WordPress XMLRPC package may have you import different items. Refer to the documentation.
Next we want to setup the WP XML-RPC client with the following line:
client = Client('http://local.wordpress.dev/xmlrpc.php', 'username', 'password')
Use your own site, username and password. This will allow Python to connect to your WordPress site using XML-RPC and thanks to the WP XML-RPC Python package we have a ton of different things we can do to manipulate WordPress.
Next I wrote a function called getPage which will do the following given a URL and file name:
- If the file name does not exist, download the HTML into the pages directory and into the file name
- If the file exists, load the HTML directly from the file
- Either way run the HTML through Beautiful Soup so it returns ready to go
def getPage(url, filename):
    if filename == '':
        print "No File Name"
        exit()
    c = ''
    if os.path.isfile('pages/'+filename):
        print("Loading the data via the file.")
        f = open('pages/'+filename, 'r')
        c = f.read()
    else:
        print("Fetching the data via the URL.")
        result = requests.get(url)
        c = result.content
        f = open('pages/'+filename,'w')
        f.write(c)
    f.close()
    c = BeautifulSoup(c)
    return c
We can test what we have so far by adding:
print getPage("http://news.ycombinator.com/", "hackernews.html").prettify()
You can run the script by typing the following into your terminal:
python scraper.py
At this point running the code should print out the formatted HTML of the Hacker News homepage! Running the code also stores that HTML in a files called hackernews.html in the pages directory and it will now load from that to save time. If this is not what you want you can edit the getPage function accordingly.
Getting our Links
Now that we have a Beautiful Soup object of our Hacker News HTML we can search for our links! Modify the print line into this:
html = getPage("http://news.ycombinator.com/", "page1.html")
Sweet, now we can utilize the select function in Beautiful Soup to select the rows that the links reside in like so:
rows = html.select('#hnmain > tr:nth-of-type(3) > td > table > tr');
Now we can loop through each of the rows that the links reside in and select our links like so:
for row in rows:
    if row.select('.title'):
        link = row.select('td:nth-of-type(3) a')
        print link
Running this code will output all the links on Hacker News, super easy right?
Adding them to WordPress
Now we need to tell Python what to do with our new data. Thanks to the WP XML-RPC package we can easily tell Python to add a new Post to our WordPress site. Modify the block above to the following:
for row in rows:
    if row.select('.title'):
        link = row.select('td:nth-of-type(3) a')
        post = WordPressPost()
        post.title = link[0].text
        post.post_type = "post"
        post.content = link[0].get('href')
        post.post_status = "publish"
        addpost = client.call(posts.NewPost(post))
In the above code we are creating a new WordPressPost and setting it’s attributes before calling the WP XML-RPC client to add a new post. The value of addpost will be the new Post ID if successful.
Note: BACKUP YOUR SITE BEFORE RUNNING THIS. Actually just backup your site anyway but especially before running code that changes your site.
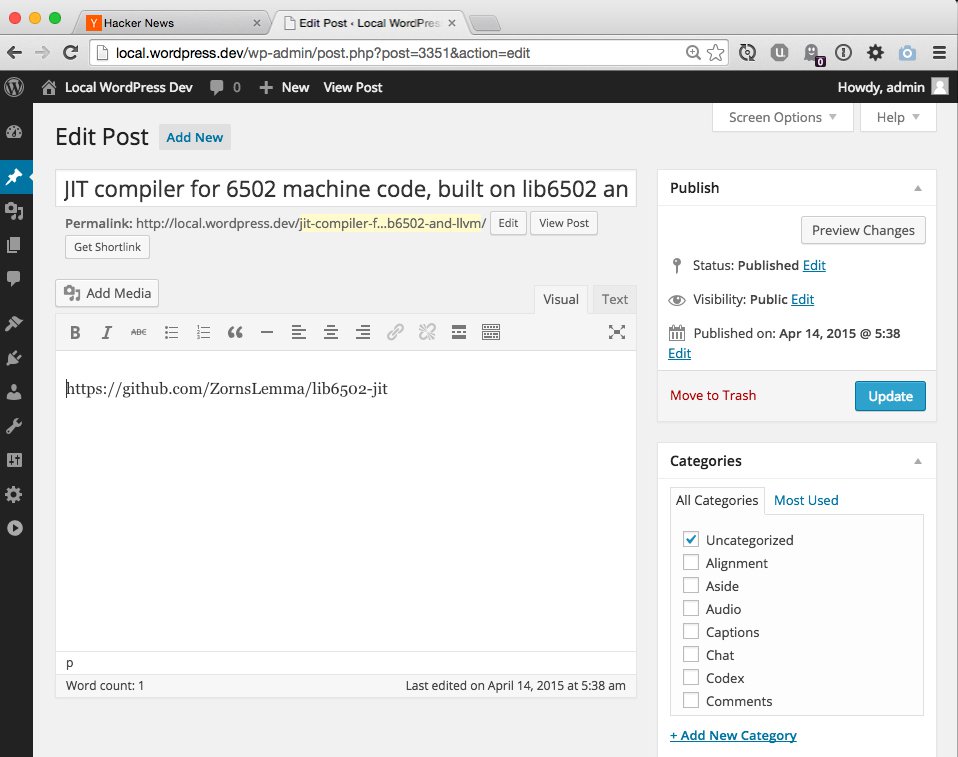
Running this will take the links we scraped and make new Posts on your WordPress site and the content of those posts will be the link like shown below:
While this particular script isn’t very useful hopefully it demonstrates how easy it is to scrape websites and use that information to bend WordPress to your will.
If you want to look busy/cool while the script is running I recommend adding termcolor to your imports and setting it up so it will give you verbose feedback as to what’s happening in the script. Throw the terminal up in a fullscreen window and not only will you look like a badass hacker to people who have no idea what they’re looking at but it’s also super fun to watch your hard work working so you don’t have to.
3. Conclusion
Exploring the WP XML-RPC Python Documentation shows that we can do all sorts of things with WordPress using Python. I’ve only just scratched the surface of what’s possible here.
Using variations of this script I’ve moved entire old E-Commerce websites with thousands of products to WordPress/WooCommerce in only a few hours, and trust me it is worth the pain of learning this stuff.
There’s really no end to the usefulness of knowing how to scrape websites with Python and knowing how to apply it to WordPress.
You can see the script in its entirety on Github here.